Images
FlightPlan's Img element wraps the standard HTML <img> tag with a fluent API. This page covers everything you need to display, size, align, rotate, lazy-load, and click images in your app — plus the file-serving conventions you need to know to make the URLs work.
Where Image Files Live
FlightPlan's HTTP server serves any URL starting with /images/, /css/, /js/, or /fonts/ as a static file (case-insensitive). The path after the prefix maps directly onto disk, relative to the running host's base directory.
// URL the browser requests:
/Images/Chicago.png

// File location on disk:
{appBaseDirectory}/Images/Chicago.png

// Where {appBaseDirectory} is the directory containing the running host .exe
// (typically the FlightPlan server process). Each app's Images/ folder ends up
// merged into a single deployed Images/ folder at runtime.
Supported image formats are .png, .jpg/.jpeg, .gif, .svg, and .ico. The server picks the right Content-Type header based on the file extension. Anything else returns as application/octet-stream — fine, but the browser may force it to download instead of display inline.
URL prefix matching is case-insensitive (/Images/foo.png and /images/foo.png both resolve), but the file path on disk follows the operating system's rules. On Windows, anything works. If you ever deploy to a Linux host, the case has to match the file.
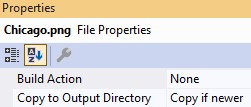
Ensure the image is stored in /Images in the root of the FlightPlan.{proejct} folder. For each image, right-click the properties and change Copy to Output Directory : Copy if newer.
Displaying an Image
The constructor takes (src, alt). Alt is the second argument and is required for accessibility — screen readers announce it, and search engines and broken-image fallbacks both use it. Pass an empty string only when the image is purely decorative and adds no information.
// Standard usage
content.Add(new Img("/Images/Chicago.png", "City of Chicago"));

// Decorative only — empty alt is correct here, screen readers skip it
content.Add(new Img("/Images/divider.png", ""));

Sizing: WithWidth and WithHeight
Both methods take a string so you can mix unit types. A bare number ("100") is treated as pixels by the browser; you can also pass any CSS length ("50%", "3em", "10vw").
// Pixels (the bare-number default)
new Img("/Images/logo.png", "Logo").WithWidth("120").WithHeight("60")

// Percentage — fills its container width, height auto-scales
new Img("/Images/banner.png", "Q3 banner").WithWidth("100%")

// Mixed units
new Img("/Images/icon.png", "Save").WithWidth("1.5em")
If you set only one dimension, the browser preserves the image's natural aspect ratio for the other — so WithWidth("200") on a 800x400 source renders 200x100. This is almost always what you want; it's only worth setting both when the image's intrinsic ratio doesn't match what you're trying to display.
Important: Browser Scaling Doesn't Shrink the Download
WithWidth and WithHeight tell the browser how big to draw the image — they have zero effect on how many bytes get downloaded. A 4MB photo with WithWidth("50") still pulls 4MB across the wire, then scales it to 50px on display. For thumbnails, the source file should already be thumbnail-sized. FlightPlan does not do server-side image resampling; if you need that, prepare the resized files at deploy time or add a real image-processing dependency.
Centering and Alignment
An <img> is an inline element by default, so centering it follows the same rules as centering text: put text-align: center on a block-level parent. Use Td.WithStyle inside a table cell, or wrap in a Div for free-standing images.
// Inside a table cell — span all columns, center inline content
var imgCell = row.Add(new Td()
    .WithColSpan(3)
    .WithStyle(s => s.TextAlign("center")));
imgCell.Add(new Img("/Images/Chicago.png", "Chicago").WithHeight("100"));

// Free-standing — wrap in a Div with text-align:center
var center = content.Add(new Div().WithStyle(s => s.TextAlign("center")));
center.Add(new Img("/Images/banner.png", "Banner").WithWidth("400"));
See the Tables guide for the table-cell pattern in context.
Rotation
Use WithStyle and Style.Transform with a CSS rotate() value. Positive degrees rotate clockwise, negative counter-clockwise. The image keeps its original layout box — neighboring elements don't reflow when you rotate — so a 90° rotation of a wide image will visually overhang its column unless you account for it in the surrounding layout.
new Img("/Images/scan.png", "Document")
    .WithWidth("100")
    .WithStyle(s => s.Transform("rotate(90deg)"));

// Common values
.Transform("rotate(90deg)")    // sideways, top edge to right
.Transform("rotate(180deg)")   // upside-down
.Transform("rotate(-90deg)")   // sideways, top edge to left
.Transform("rotate(45deg)")    // diagonal
Transform also supports scale(), translate(), and skew() if you ever need those — the same Style.Transform call accepts any valid CSS transform value.
Lazy Loading
WithLazyLoad() emits loading="lazy" on the <img> tag. The browser then defers the image's network request until the image is close to entering the viewport. Native HTML feature, no JavaScript, supported in every modern browser.
// Long page with many images? Mark them lazy.
foreach (var report in reports)
{
    content.Add(new Img($"/Images/Reports/{report.Thumbnail}", report.Title)
        .WithWidth("200")
        .WithLazyLoad());
}
Use WithLazyLoad on:
- Long scrolling pages where most images are below the fold (gallery views, archive listings, multi-page reports)
- Image-heavy dashboards where most tiles are not initially visible
- Any page where total image weight exceeds a few MB
Do NOT use WithLazyLoad on:
- Above-the-fold images (logo, hero banner) — lazy loading there can cause a visible "pop in" on slow connections
- Pages with only a handful of images — the overhead of deferring isn't worth the 30KB you save
- Anything in a print stylesheet path — print previews can fire image loads in unexpected order
Image as a Link
Wrap the Img in an A. Both are first-class DOM elements; A is a ContainerElement that renders its children inside the anchor.
var link = content.Add(new A("/Reports/Chicago", ""));
link.Add(new Img("/Images/Chicago.png", "View Chicago report")
    .WithWidth("150")
    .WithTitle("Open Chicago report"));
WithTitle adds a tooltip on hover — usually a good idea for clickable images so users see where the link goes before they click.
Anti-pattern: do not wrap an image in <a href="/"> just because surrounding code did. If clicking the image isn't supposed to navigate anywhere, drop the A entirely. A link that goes nowhere meaningful (back to the same page, or # with no handler) is worse than a static image — it sets up a false expectation and produces an accidental navigation when clicked.
Image as a Postback Button
Use Button as a container, with the Img as its only child. Button is a ContainerElement and renders any children inside the <button> tag — so you get a real form-submitting button that displays an image instead of text. WithName ties it into the framework's HandleAction flow exactly like a text button.
// At the top of the page class:
private const string BtnSave   = "btnSave";
private const string BtnCancel = "btnCancel";

// Inside BuildContent, building the form:
var saveBtn = form.Add(new Button(ButtonType.Submit, "").WithName(BtnSave));
saveBtn.Add(new Img("/Images/save.png", "Save")
    .WithWidth("24")
    .WithTitle("Save changes"));   // tooltip on hover

// Inside HandleAction:
protected override void HandleAction(string action)
{
    if (action == BtnSave)
    {
        // ...save logic
    }
}
Note: Button(ButtonType.Submit, "") — the empty text string is intentional. The button has no text label, only the image child. The Img's alt text provides the accessible name for screen readers; WithTitle on the Img provides a hover tooltip for sighted users. With both set, the button is fully labeled without needing visible text.
Why this beats <input type="image"> (the classic HTML "image button"): an input-image submits the click coordinates as name.x and name.y, which is awkward and doesn't match this framework's name-only HandleAction pattern. A <button> with an <img> child posts the button's name in __EVENTTARGET like every other button in the framework.
Sample image button (rendered standalone — its real form would post on click):
Inline SVG via Data URI
Sometimes you don't want a separate file — an icon used in exactly one place, a documentation demo that needs to work without deployed assets, or a visualization built from runtime data. SVG markup can be embedded directly into the src attribute as a data URI, with no network request involved.
// Inline SVG — the entire image is in the src string
const string CheckSvg =
    "data:image/svg+xml;utf8,<svg xmlns='http://www.w3.org/2000/svg' viewBox='0 0 24 24'>" +
    "<circle cx='12' cy='12' r='10' fill='%233498db'/>" +
    "<path d='M9 12l2 2 4-4' stroke='white' stroke-width='2.5' fill='none'/></svg>";

content.Add(new Img(CheckSvg, "Done").WithWidth("24"));
Two encoding rules to remember: the # character (used in CSS color literals like #3498db) must be URL-encoded as %23 inside a data URI. Use single quotes for SVG attributes inside the data URI so they don't conflict with the C# string's double quotes.
When to use inline SVG instead of a static file:
- Tiny one-off icons that aren't worth a deployment slot
- Demos and documentation pages that should work without deployed image assets
- Graphics generated at runtime from data (charts, sparklines, status indicators)
- Anywhere you need to color-coordinate the icon with surrounding text — inline SVG can use currentColor
When NOT to use inline SVG: anything reused on multiple pages (a static file gets cached by the browser; an inline data URI is downloaded fresh with every page that contains it).
Accessibility: Alt Text
Every Img renders an alt attribute, even if you pass an empty string. The choice of alt text matters more than developers realize:
- Content images (photos, diagrams, screenshots): alt text describes what the image conveys — "Chart showing Q3 sales up 12%", not "chart.png".
- Icons that label a button or link: alt text says what the action is — "Save", "Delete", not "floppy disk icon".
- Decorative images (dividers, backgrounds, ornamentation): use alt="" — empty string. Screen readers skip these entirely. This is correct behavior; you do not want "divider line" announced to a screen reader user.
- Never use the filename as alt text. Never use "image" or "picture" — screen readers already announce "image"; that would produce "image image".
Quick Reference
All fluent setters on Img:
- .WithSrc(string) — change the source URL after construction
- .WithAlt(string) — change the alt text
- .WithWidth(string) / .WithHeight(string) — sizing in any CSS length
- .WithClass(string) — CSS class name
- .WithId(string) — element id, for CSS or JavaScript targeting
- .WithTitle(string) — tooltip text on hover
- .WithLazyLoad() — defer loading until near viewport
- .WithStyle(s => ...) — inline CSS via the Style fluent API (TextAlign, Transform, BorderRadius, etc.)